General Actions:
20.1 Approval Search and Selection
When the Outstanding Approvals tab is selected, the system will identify the organisational level permission of the logged in administrator:
- If the administrator’s Permitted Administration Organisation is defaulted to or includes permission for level 1 (i.e. site level), a level 2 organisation must first be selected and an Organisation Selection screen will open.
- For any administrator who is level 2 (i.e. ‘Company’ level) or below, the Outstanding Approvals – Approval Listing screen opens where approval objects can be searched and selected for reassignment.
Organisation Selection
All level 1 site administrators must first select and an organisation in which to manage approvals. Most administrators will not have access at the site level and therefore this selection will usually be by-passed.
A drop down list box is presented containing all level 2 organisation descriptions. One organisation must be selected before the Continue button becomes active. Clicking the Continue button will open the Outstanding Approvals – Approval Listing screen for the selected organisation.
Approval Listing Table
For a user who is not a site administrator (i.e. level 2 ‘Company’ admin or below), the landing page after selecting the Outstanding Approvals menu option is the Outstanding Approvals – Approval Listing screen.
The default display populates the approvals table with all current outstanding approval tasks for the logged in user’s default Permitted Administration Organisation. The scope of all subsequent searches is similarly limited to the logged in user’s Permitted Administration organisation.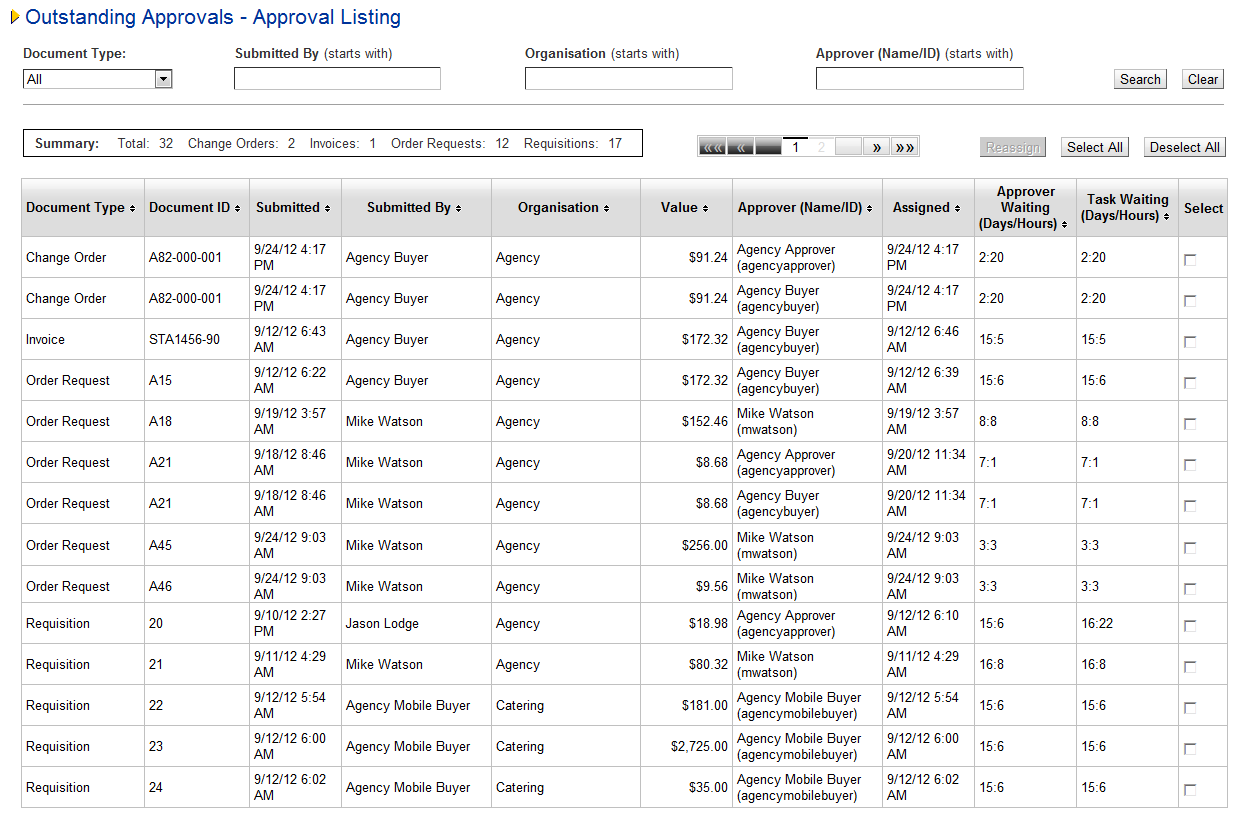
The outstanding approvals table displays the following column headings:
- Document Type. This is one of the following object types that can be outstanding for approval:
- Change Order
- Invoice
- Order Request
- Requisition
- Document ID. This is the document identification number (e.g. requisition id or invoice number)
- Submitted. This is the date and time the document was originally submitted into the current approval process (i.e. the start of the approval plan). The display is in the appropriate format for the logged in user’s locale (i.e. UK: DD/MM/YYYY HH:MM; US: MM/DD/YYYY HH:MM) and uses the 24hr clock.
- Submitted By. This is the full User Name of the document owner.
- Organisation. This is the Name of the organisation that the document owner is assigned to.
- Value. This is the document (approval object) total.
- Approver (Name/ID). This is the name and id of the user who currently owns the approval task (i.e. the approver).
- Assigned. This is the date and time that the document was assigned to the current owner (i.e. entered the step in the approval plan). The display is in the appropriate format for the logged in user’s locale (i.e. UK: DD/MM/YYYY HH:MM; US: MM/DD/YYYY HH:MM) and uses 24hr clock.
- Approver Waiting (Days/Hours). This is the calculated time that the document has been outstanding with the current approver. It is the difference between the current date and time (i.e. when the Outstanding Approvals – Approval Listing screen opened) and the ‘Assigned’ date and time. It is displayed in Days and Hours with all minutes being rounded up to the nearest hour (i.e. 1 minute through to 59 minutes will = 1hour).
- Task Waiting (Days/Hours). This is the calculated time that the document has been outstanding with the approval task. It is the difference between the current date and time (i.e. when the Outstanding Approvals – Approval Listing screen opened) and the date and time the document was originally sent for approval under this approval step (i.e. first sent to the original approver(s)). It is displayed in Days and Hours with all minutes being rounded up to the nearest hour (i.e. 1 minute through to 59 minutes will = 1hour).
- Select. This column displays a check box in order to select an approval object. The default is unchecked.
The sort sequence for the outstanding approvals table is: Document Type, alphabetically ascending, then, Document ID, alpha-numeric ascending in order to display the oldest record first. In the unlikely event that a document ID is not unique, the sequence is next sorted by Submitted date.
It is possible to sort the content of the outstanding approvals table by clicking on any column header (except ‘Select’). Clicking once will sort descending and twice will sort to ascending. Subsequent clicks will reverse the sort order.
Summary Bar
A Summary bar displays the number of outstanding approval objects currently displayed in the outstanding approvals table: the summary totals will update dynamically as filters are applied or reset.
The “Total:” indicates the sum of all the outstanding approval objects and numeric values display for each document type. If there are no outstanding approvals for a document type the numeric value will indicate as zero.
Pagination
When more than 10 approval objects are returned by the search, multiple pages are created which are added incrementally as required: one page per factor of 10. Page numbering and navigation allows the user to scroll between pages of results when there is more than one page.
Search and Filter
Search fields are provided at the top of the outstanding approvals table to filter the table content.

- Document Type - a drop down selection box containing the name of each Document Type:
- Requisition
- Order Request
- Change Order
- Invoice
- Submitted By (starts with) - text box for the entry of the document owner’s (i.e. requisitioner or invoicer) user name. The system will filter using the start of the text string. For example, entering ‘al’ will find all users who’s name begins with ‘al’ including: ‘Alex’, ‘Alexis’, ‘Alistair’, ‘Ally’ etc
- Organisation (starts with) - text box for the entry of name of the organisation that the document owner is assigned to. The system will filter using the start of the text string. For example, entering ‘ma’ will find the ‘Marketing’ department.
- Approver (Name/ID) (starts with) - text box name and id of the user who currently owns the approval task (i.e. the approver). The system will filter using the start of the text string. For example, entering ‘al’ will find all users who’s name begins with ‘al’ including: ‘Alex’, ‘Alexis’, ‘Alistair’, ‘Ally’ etc
It is possible to enter one or more search options joined by the Boolean ‘AND’. Clicking the ‘Search’ button will undertake a new search based on the criteria entered, refreshing the results table and replacing all previous content. Selected approval lines are not be saved or retained but will be overwritten along with all other lines when a new search is undertaken.
The clear button will clear the search fields and remove all text from the ‘Submitted By’, ‘Organisation’ and ‘Approver’ search boxes.
Selecting Task to Reassign
Two selection buttons enable the mass selection of approval objects for reassignment. Any existing selections will be overridden.
- “Select All” automatically checks all boxes in the Select column (i.e. selecting all approval objects in view).
- “Deselect All” automatically un-checks all boxes in the Select column (i.e. de-selecting all approval objects in view).
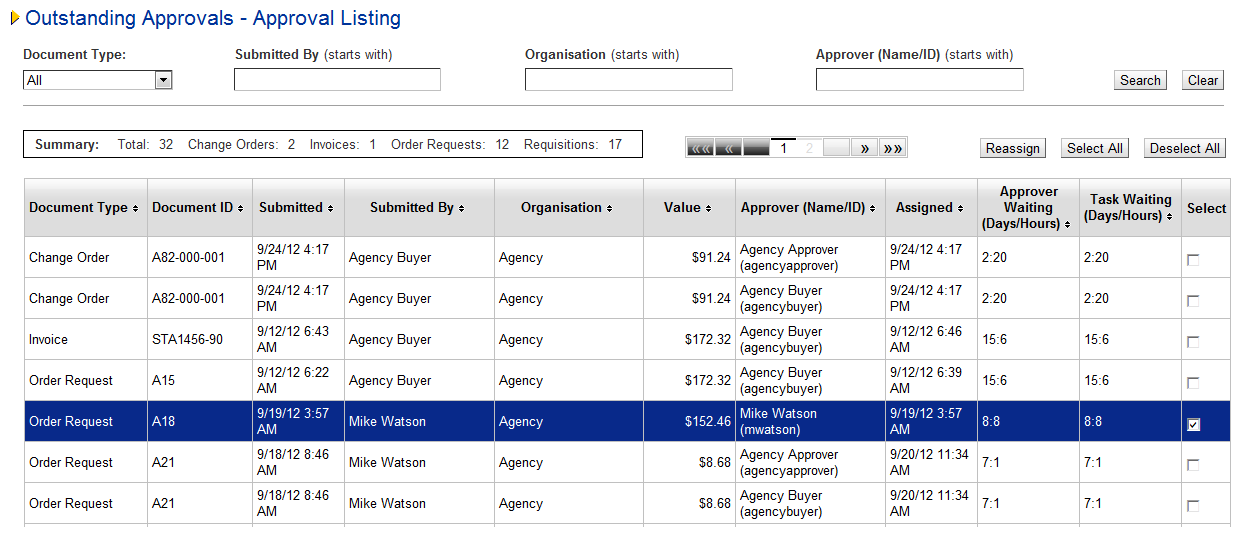
It is possible to individually select a single row by checking the box in the Select column. More than one selection can be made and rows are checked and unchecked independently, even after the ‘Select All’ or ‘Deselect All’ buttons are selected. When the ‘Select’ check box is checked, the row is highlighted.
Selected rows are not cumulatively stored or saved between searches. If a new search is undertaken after a line(s) has been selected, the results table is completely refreshed for all lines (selected and not selected). The reassignment selection must be started again.
Clicking the Reassign button will progress the user to the Approval Reassignment screen where the selected approval objects can be reassigned to an alternate approver.
Validation will take place to ensure that at least one row is selected in the outstanding approvals table. Validation failure will result in an error message being presented: “You must select at least one approval document to reassign before continuing.” and the user will remain in the ‘Outstanding Approvals – Approval Listing’ screen and the screen.
Navigation
P2P Admin