General Actions:
18.4.4 Owner
After completion of the Task Activity sub window, click on the Owner button to open the task’s Owner sub window.
Here you must enter the details of the user who is to be responsible for undertaking the activity, how any role is to be resolved and the approvers editing permissions.
Owner button hidden
Note that a Task Owner is not defined when the following Activities are selected:
- Initiate External Process
- Execute Sub Plan
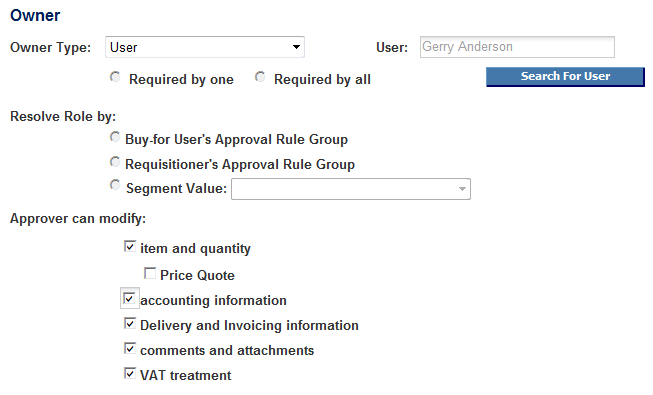
Owner Type
Choose who is to own / take responsibility for the activity. In the drop down selection box choose one of two owner types: selection is mandatory.
- User. The activity is to be assigned to a named PECOS P2P user.
1a. User Search sub window will open for you to search for a user profile. Enter a partial value in the text box before clicking the search button to wildcard and refine your search. When the user list appears, click on the Select button for the user you want to be the owner of this task. The user will appear in the box (now labelled ‘User’) to the right of the owner type selection box. - Role. The activity is to be assigned to an approval Role.
After selection, the box to the right of the Owner Type will be labelled ‘Role’. Choose a role from the selection box.
In addition to those Roles created (see Approval Roles), the list may include four system defined approver roles that are fixed and can be selected as required:
- Requisitioner: The owner of the task is defined as the Requisitioner – the user who creates the requisition document or order request document.
- Buy-for user: The owner of the task is defined as the Buy-for user defined in the requisition or order request. (The requisition default assigns the Requisitioner as the Buy-for user until a selection is made.)
- Invoicer: The owner of the task is defined as the user who creates the invoice document.
- Budget Line Owner: This role will only be available if Budget Checking is activated. The owner of the task is the designated owner of the budget line, as defined in the budget.
Role Approval Requirement
These radio buttons are available when the owner type of Role is selected and a role other than Requisitioner or Buy-for user is selected. This will define how may of the users who are assigned to the role in Approval Rule Groups, are required to perform the activity before it is considered completed. This requirement is usually linked to the activity ‘Request Approval’.
- Required by one: Only one of the users assigned to the role need to perform the task action for it to be considered completed. The document will move forward onto the next task after one approver completes an approval action. If there is more than one role owner, documents are removed from all approver’s inboxes after the first role owner has performed the approval activity.
- Required by all: All users assigned to the role need to perform the task action for it to be considered completed. The document will move forwards in the approval plan onto the next task only after all the approvers complete their approval action.
Resolve Role by
This is mandatory if the approval is owned by a Role. The role resolution defines which Approval Rule Group is used to define who the owner of the role is.
- Buy-for User’s Approval Rule Group: PECOS P2P uses the Approval Rule Group of the buy for user (i.e. the person for whom a requisition is raised for) to determine approval rules. All documents are routed using the buy for user’s approval plan assignment and role owners. In this way you are able to ensure that approval is undertaken by the appropriate approvers.
- Requisitioner’s Approval Rule Group: PECOS P2P uses the Approval Rule Group of the Requisitioner (i.e. the person who creates a requisition) to determine approval rules. All documents are routed using the Requisitioner’s approval plan assignment and role owners.
- Segment Value: If you wish to route approval based on an account code and have created account code based Approval Rule Groups, select Segment Value. Choose an accounting method Segment from the dropdown list (all will be available). This will determine the Approval Rule Group used for approval: PECOS P2P will source the ARG by matching the Segment value used in the document being routed for approval with that contained in an ARG. The segment value used is most often a cost centre, to ensure approval is undertaken by cost centre or budget code managers.
ExampleIf approval is to be based on the cost centre that a requisition is charged to, the following is a simple example of approval setup.
a) Setup a role called ‘Cost Centre Manager’.
b) Approval Rule Groups must be created for routing requisitions based on cost centre. These are not assigned user membership. The Role Assignment permissions must be made for role Cost Centre Manager and the Financial Tracking segment value(s) selected in the Financial Tracking window. These are the cost centres that the role owner is to approve.
c) In the Approval Plan Owner window, for the appropriate approval task, select the ‘Owner Type’: Role and choose Cost Centre Manager. Then select ‘Resolve Role by’: Segment Value and choose Cost Centre.
d) PECOS P2P will now identify the cost centre value used in the requisition and use the Approval Rule Group that also contains this value. The requisition is sent to the cost centre manager role owner defined in this group.
Approver Can Modify
When the Activity Request Approval is selected, the approver is able to perform editing activities during the approval process. Here you are able to define the scope of editing activity. You might want to liaise with your internal audit department before defining editing rules for approvers
- Requisition Plans. As many or as few of the following selections may be made. If no selection is made the approver is unable to perform any editing during approval:
- Item and quantity: Line items can be deleted, added and quantities changed.
- Price Quote: When Price Quote is enabled this will display as a child value of Item and Quantity and will selectable when this is first selected. Selection will enable the task owner to create a quote during approval and edit the requisition with any award decision.
- Accounting information: The Financial Tracking icon is displayed to allow the editing of account codes at header or line level.
- Delivery and invoicing information: The requisition and order delivery and invoicing links are displayed allowing the editing of delivery addresses, invoice information, supplier terms, payment method and request date.
- Comments and attachments: The paper clip icon is displayed to allow the editing of internal comments, external comments and attachments.
- VAT treatment: The VAT code assignment can be edited at header and line level
- Purchase Order and Change Order Plans. As many or as few of the following selections may be made. If no selection is made the approver is unable to perform any editing during approval:
- Item and quantity: Line items can be deleted, added and quantities changed.
- Accounting information: The Financial Tracking icon is displayed to allow the editing of account codes at header or line level.
- Delivery and invoicing information: The requisition and order delivery and invoicing links are displayed allowing the editing of delivery addresses, invoice information, supplier terms, payment method and request date.
- Comments and attachments: The paper clip icon is displayed to allow the editing of internal comments, external comments and attachments.
- VAT treatment: The VAT code assignment can be edited at header and line level
- Invoice Settlement Plans. As many or as few of the following selections may be made. If no selection is made the approver is unable to perform any editing during approval:
- Invoice item and quantity: Invoice items can be fully edited. Quantities and values are fully editable.
- Invoice accounting information: Line and Header level accounting is editable for all invoices.
- Payment terms: The ‘terms lookup’ button is displayed for payment terms to be changed.
- Remit address: An ‘address lookup’ button is displayed for the remittance address to be changed for the invoice.
Navigation
P2P Admin