General Actions:
19.1.4 Role Assignment
After assigning Approval plans to the Approval Rule Group it is important to assign a user to all the Roles that are used in those Plans.
If a role is not specified the approval step will fail. Before assigning roles therefore, it is important that you note what roles are used in the plans associated with this group.
The advantages of using Roles in your approval plans have been discussed earlier but it is clear from these assignment screens that:
- Roles allow the same approval plans to be used by multiple divisions and departments – i.e. Plans are assigned to different Approval rule Groups.
- Roles allow more than one person to fill the role of approver.
Example
For example, an organisation might have two sales branches that use the same plan but have different managers that wish to approve orders.
In the Birmingham office, John Smith is the Branch Manager. In the Boston office, Mary Jones is the Branch manager. Each office has several sales representatives. The configuration of the approval rule group is shown below.
| Birmingham | Boston | |
| Branch Manager | John Smith | Mary Jones |
| Sales Representatives | J. Elway P. Roy D. Issel | T. Williams B. Orr L. Bird |
| Approval Plan | Standard PO Plan | Standard PO Plan |
| Approval Rule Group | Birmingham Approval Rule Group | Boston Approval Rule Group |
Two Approval Rule Groups are created, both using the same Approval Plan. The approval plan contains an approval step that is owned by the role of ‘Branch Manager’.
In the ‘Birmingham Approval Rule Group’, the approval plan ‘Standard PO Plan’ is assigned and the role of Branch Manager is assigned to John Smith. J. Elway, P. Roy and D. Issel are all assigned membership to the group.
In the ‘Boston Approval Rule Group’, the approval plan ‘Standard PO Plan’ is also assigned and the role of Branch Manager is assigned to Mary Jones. T. Williams, B. Orr and L. Bird are all assigned membership to the group.
To assign Roles follow these steps:
- Click on the Roles button in the Approval Rule Group Screen to open the Role Assignment window.
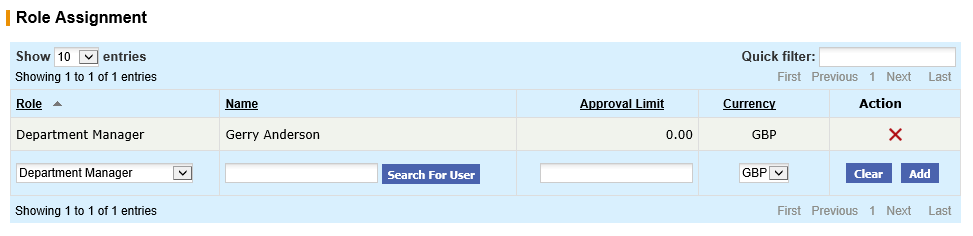
- At the bottom of the Role Assignment table, choose the Role you wish to assign to a user from the Roles dropdown list.
- Click the Search for User button to open a User Search sub window.
- Select the user whom you wish to assign to the role by clicking Select by their name.
- Click the Add button to add this assignment to the table.
- Repeat these steps until users have been assigned to all roles used in the plans assigned to this group. Note that multiple users may be assigned to the same Role.
- To remove a Role assignment at any time click the delete icon (X) in the Action column.
There is no need to select an Approval Limit or Currency. Approval limits are defined in the Approval Plan Criteria.
Search and Filter
The Role Assignment table will display 10 entries, sorted alphabetically by default but can be extended using the Show entries control in the top left hand corner of the table. Using the list box, choose an override to display 25, 50 or 100 entries. When more than one page is available, pagination controls will display the number of pages of entries and allow you to scroll or jump between those pages. A Quick filter provides a 'type ahead' text search, which automatically filters the entries in the table using the string of characters entered.
Navigation
P2P Admin