General Actions:
23.1 Document User Field Definitions
Document User Fields are extensible definable fields that allow the system administrator to extend the application by creating customised fields for users to enter additional procurement information into requisition, order and invoice documents.
Document User Fields are one of two types of user definable field available in PECOS P2P and are accessed through the ‘Documents’ option under ‘User Field Definitions’ in the Utilities tab.
Field content is available to the workflow approval process and can be configured to contain default data. The fields can additionally be configured as open fields for text entry or with selectable options from customisable drop-down lists. There are two types of Document field: Order and Invoice.
Order Fields
Invoice Fields
Formats
Document user fields can be flexibly formatted to provide accurate data capture for all users in specific organisational units and ensure appropriate information is used for approval and in integration files. The following attributes can be optionally selected for each field:
- Use in Approval Plans
- Include in Export utilities
- Mandatory completion
- Editable text entry or Create selectable options
- String, Integer, Decimal or Date data type allowed.
Uses
Uses and advantages of these user fields are:
- Important information can be captured in purchasing documents.
- Additional data can be included for exports into back-end office systems.
- Additional information can be added to the purchase order transmitted to suppliers.
- Customised fields can be used in approval workflow plans for system processing and approval routing. This improves the overall efficiencies and effectiveness of the entire purchasing process.
- Additional keywords can be made available for use in automated eMail and audit trail messages.
Usage Examples
- If an organisation requires contract numbers to be entered on certain purchase orders, the system administrator can create a customised, optional text entry Order Field to enable the requisitioner to enter contract ID numbers.
- A commodity manager, responsible for the approval of capital expenditure, needs to know which capital annuity a requisition is to be charged against. An optional Order Field can be created with Field Options defining the available capital annuity codes for the requisitioner to select from. The new field and selectable options can also be made available for approval routing to ensure that the commodity manager only receives appropriate documents for approval.
- Accounts clerks who experience quality problems or disputes with suppliers need to be able to temporarily withhold payment permission for some invoices. The system administrator is able to create a new Invoice Field called ‘Hold’ with two, yes or no, selectable options. Additionally another new text entry field can be created to accommodate a hold reason. Both fields can be made available on the APExport utility for integration to the financial payment system.
- The financial controller is required to calculate KPI’s for payment days. A date type Invoice Field can be created to record dispute resolution dates for export to the finance system, for accurately calculating payments from the date an invoice dispute is resolved.
Field Uniqueness
The uniqueness of a Document User Field is defined by its Key. As long as the field key is different, it will be visible to users within each organisational level based on the administration hierarchy described below.
Organisation Hierarchy
As with other data created in the PECOS P2P, the User Defined Field is saved against the default administration level of the administrator who creates the record for administration purposes. Procurement user access to user defined fields is based on the same principal. Therefore when an administrator creates a field it is saved against their administrative organisation and will also be available for all of the procurement users within that organisation and below. The effects of creating fields at each administrative level are described below:
L1 Site Access: A field created by the site administrator and saved organisationally at the site level (i.e. at Level 1) will be available for all users within all companies (level 2 organisations). The field can only be administered by a site administrator (level 1) and therefore fields created at the site level will always be required by and used by all companies and organisations within the whole PECOS P2P site. Fields created at this level will often be defined by your program or marketplace managers.
L2 Company Access: A field created and saved at the level 2 organisation will be available for all procurement users within that company (i.e. level 2 organisation) and below. No other level 2 organisation user will be able to see or use the field. The field can be administered by the site (level 1) and company (level 2) administrators only. Fields created at this level will always be required by and used by the whole business company / organisation.
L3 Subordinate Organisation Access: A field created and saved to a lower level department or region (i.e. at organisational level 3 or below) will be available for procurement users within that region or division (and its subordinate organisations) only. The field can be administered by the site (level 1), company (level 2) and regional (level 3) administrators. Fields created at this level will therefore be required by and used by local users only.
It is important therefore that user field definitions are saved to the correct organisation to ensure that the correct user community are afforded access.
Creating User Fields
User fields can be added at any time and will become available to requisitioners immediately. Select the Utilities > User Field Definitions > Documents tab to open the Document User Field Definitions screen.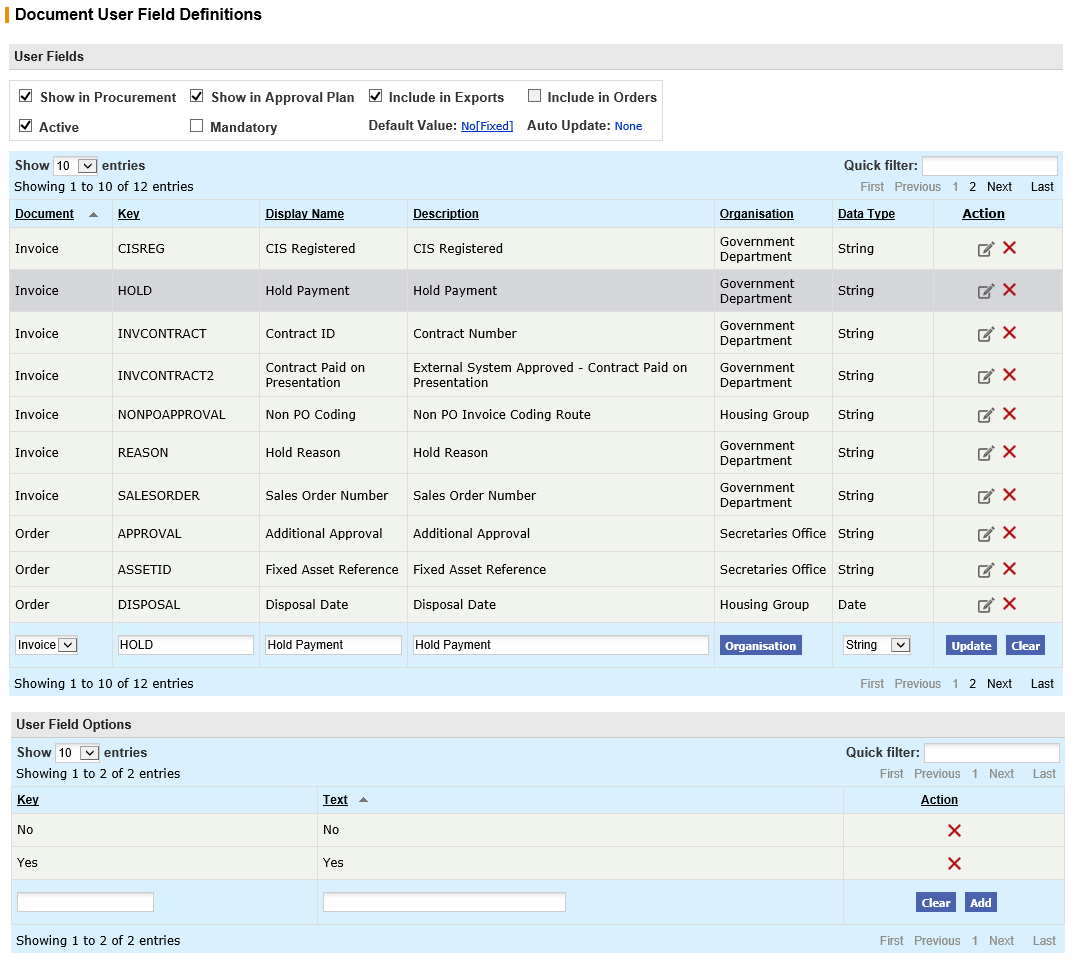
Field Header Detail
At the foot of the Field definitions table enter or select the following details:
Document Type: Select from the drop down list box whether the field is to be an order or invoice field.
- Order – the field will appear in the requisition’s additional order information section of the Requisition Delivery and Invoicing and Order Delivery and Invoicing screens.
- Invoice – the field will appear in the additional invoice information sub window of the Invoice Entry, Edit Invoice and Invoice Detail screens. It will also be displayed in the additional invoice information section of the Settlement Approval Summary screen.
Key: Enter a unique key to identify the field.
Display Name: Enter the name of the field that is to be displayed to the user. This is the label assigned to the data entry box in either the order or invoice.
Description: Enter a full description of the user field. The full description is available to fully describe the requirement, use and purpose of this field within the administration screen. The description is also used by the approval plan to define the field criteria when the attribute ‘show in approval plan’ is selected. For example the criteria description will appear: “User field ‘description’” where ‘description’ is the description entered here.
Data Type: select from the drop down selection box what type of data your new field is to accept.
- String – any series of data characters
- Integer – any whole number only
- Decimal – any decimal number (up to 6 decimal places) only
- Date – the field will be a date, entered and maintained using a pop up calendar.
Field Attributes
Select from the following options: check the box to turn the attribute on.
Show in Procurement: (default is yes) the field will be displayed in the appropriate areas within the procurement module. The display of the fields enables them to be completed or updated by the requisitioners and approvers.
Show in Approval Plan: (default is yes) the field will be available as selectable criteria for defining tasks within approval plans:
- Invoice Type: All data types except ‘Date’ can be selected for inclusion in approval plans. Criteria will be available to invoice settlement plans only.
- Order Type: available to all plan types.
Include in Exports: (default is no) the field will be included in the standard XML interfaces.
Include in Orders: (default is no) the field will appear in all Purchase Orders. This option is available for Order document types only.
Active: (default is yes) the field is active. Uncheck the box at any time to disable this user field. (Note that once actively in use, a field cannot be deleted.)
Mandatory: (default is no) completion of the field is mandatory by the user when entering a requisition (for order type) or invoice (for invoice type).
Default Value: (default is ‘none’) enables a default value to be set which will automatically populate the field.
Auto Update: (default is ‘none’) enables an Invoice document with a data type of Date to be automatically updated based on a future invoice settlement event. This option is greyed out for all other document and data type combinations.
Default Value
A default value can be set to display automatically in the user field. (This default can be changed by the user.) To change the default value click on the existing value (the default is ‘none’) and select a default type from the Default Value pop up window.
For all document and data type combinations except Invoice > Date, there are two default types to choose from: ‘Fixed’ and ‘Supplier User Field’.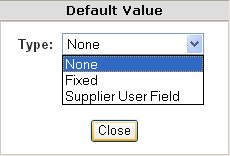
When the Document Type is Invoice and the Data Type is Date, the two default types are Invoice Date and ‘Posting Date’.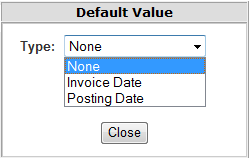
- Type = None (default)
The field will be left empty for the user to populate an appropriate value.
- Type = Fixed
The field will be populated with a value that you define. There are two options for selecting a fixed default value depending on whether or not you have created user field option (see below for how to create these options).
- If your user defined field is a text entry box (i.e. with no user field options) enter any default value to be used in the text box.
- If your user defined field is a list box, with user field options, the fixed value displayed as the default must be one of the field options defined. In the ‘Value:’ box, enter the User Field Option KEY (not the field option text).
- Type = Supplier User Field
Use this default type to populate the user field with the same value used within the supplier profile, for one of your supplier user defined fields. When this default type is selected the supplier user field descriptions will display as selectable options in the Value list.
The configuration of both the Supplier User Field Definition and the Document User Field Definition must match in one of two ways for the default value to propagate correctly:
- Both fields are text entry boxes.
As long as neither the supplier nor the document user fields have field option values that create drop down selection boxes, PECOS P2P will use the text that is entered into the supplier user field within the supplier profile to populate the default value for the document user field.
- Both fields are list boxes and the user field option keys are the same.
Both the supplier and document user fields must have field option values that create drop down selection boxes. The field value KEYS setup for the supplier user defined field must be the same as the values setup for the document user defined field for them to be recognised and propagate successfully as the default value.
Note that MIXED field types are NOT compatible for successfully propagating a default value between supplier and document user fields.
Supplier User Field Example:
Two supplier user fields are required to capture an invoice hold flag (with two options: yes or no) and an invoice hold reason (a text entry box). These fields are optionally populated by the system administrator when the finance department sends notification of supplier accounts that have been placed into dispute. There is also a requirement for the same hold flag and reason to be assigned to all invoices processed in PECOS P2P for the supplier, so that the finance system can withhold payment.
The personnel posting invoices may not always be aware of existing supplier disputes. Therefore in order to ensure that the same hold indicator and reason assigned to the supplier profile is contained in the supplier’s invoices, two invoice type document user fields must be created to capture the same information and default any existing supplier values from the supplier user field.
Supplier User Field Example Solution:
- First, setup the Supplier User Field Definitions
- The ‘Hold Invoices’ field is setup with two selectable user field options:
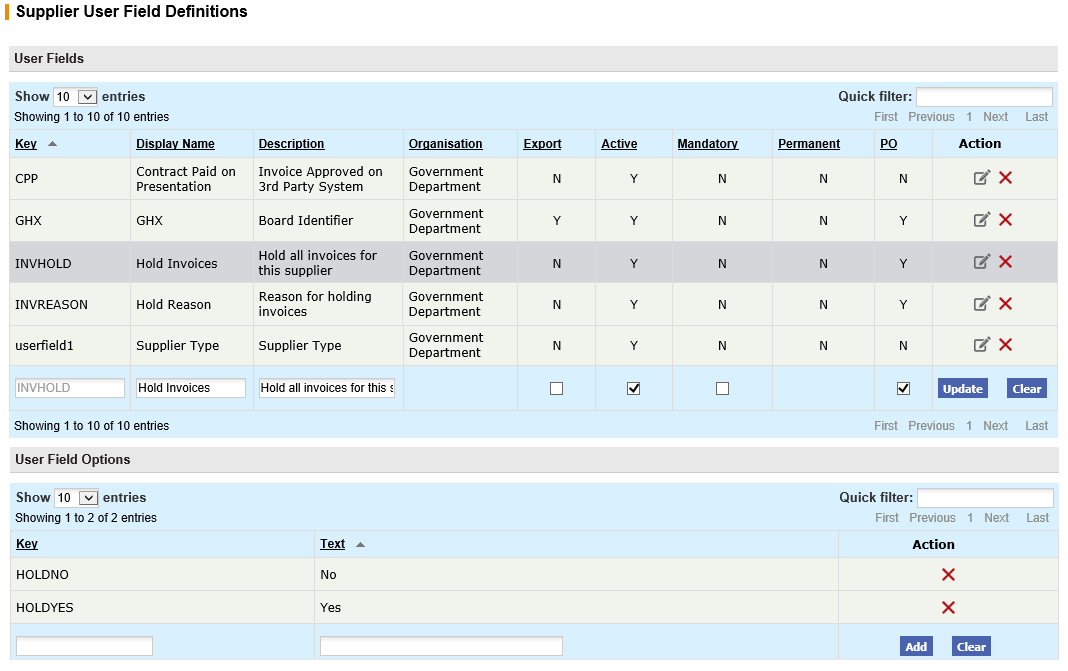
- The ‘Hold Reason’ field is setup as a text entry box without any user field options as displayed below:
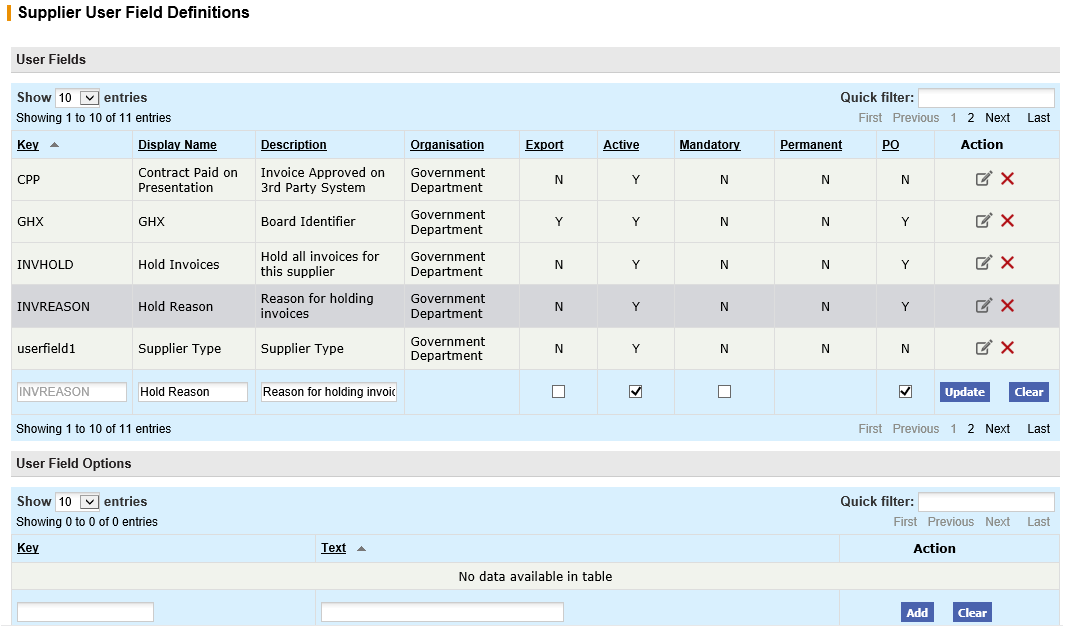
The supplier profile is now able to capture key supplier information relating to supplier payment disputes. When the system administrator is informed of a dispute by the finance department they will set the hold invoices field to ‘Yes’ and the reason for setting the hold will be entered into the ‘hold reason’ text box.
To ensure that all invoices entered for this supplier carry the same invoice hold flag and hold reason, ‘invoice’ document user fields must be created with default values that reference the corresponding supplier user field.
- The ‘Hold Invoices’ field is setup with two selectable user field options:
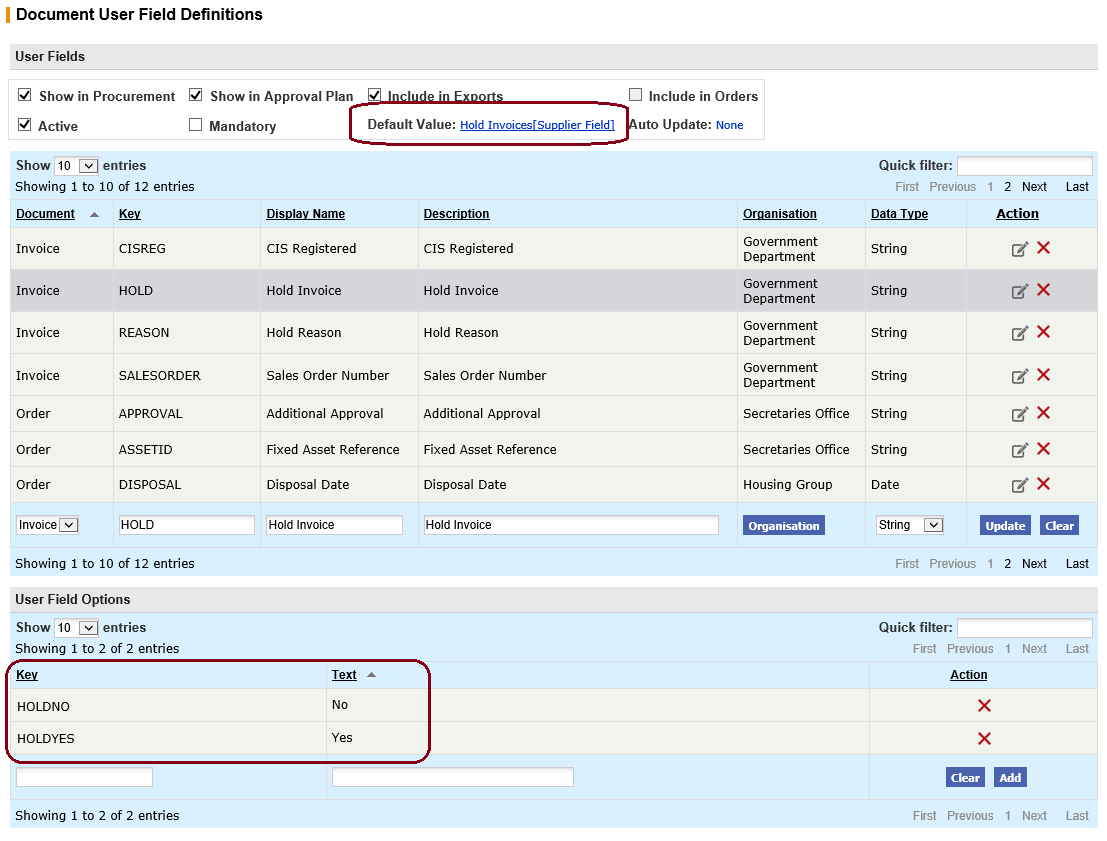
- Second, setup the Document User Field Definitions
- An invoice type field (to capture additional data on the invoice document) called ‘Hold Invoice’ is created with two user field options. Notice this field mirrors the supplier field that is to be used to capture the default value.
- The two user field options are similar to and have the same data keys as the two supplier user field options created to capture the invoice hold information.
- The Default Value is set to capture the Supplier Field: ‘Hold Invoices’.
Only if the data keys of the supplier and document user field options match will the default value propagate correctly.
Note that if the default value is not going to reference the corresponding supplier field, the user field options do not have to match: the supplier and document user fields are assumed to be independent of each other.
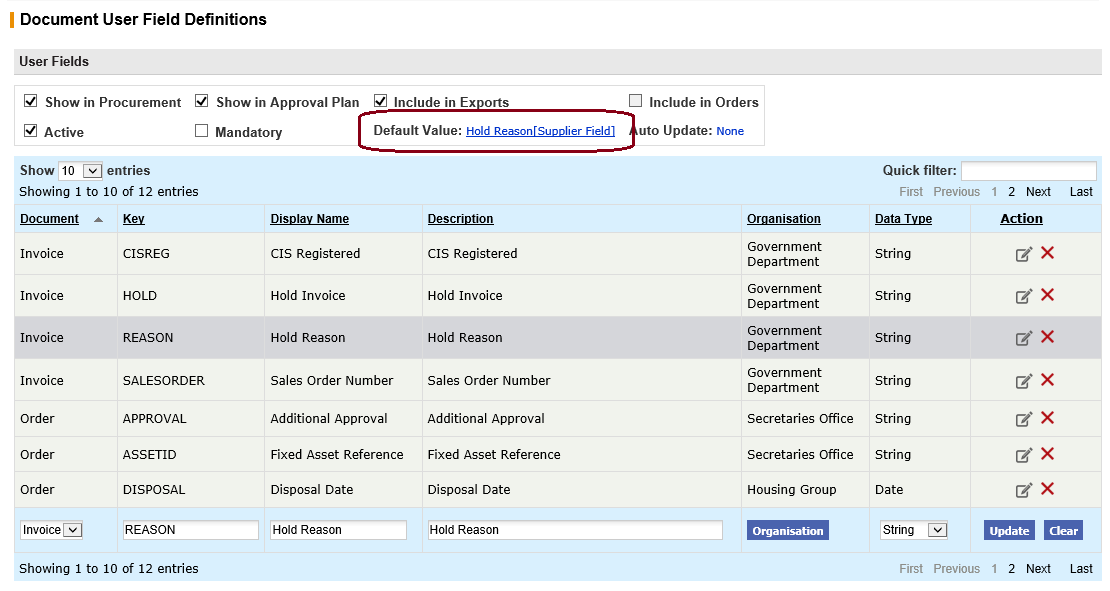
- An invoice type field (to capture the additional data on the invoice document) called ‘Hold Reason’ is created as a text field (i.e. with no user field options). Notice this field mirrors the supplier field that is to be used to capture the default value.
- The Default Value is set to capture the Supplier Field: ‘Hold Reason’.
- No user field definitions are required because the supplier field is also a text entry box.
Type = Invoice DateThis default value is available when the ‘Date’ data type is selected for the ‘Invoice’ document type only.
When the invoice form is refreshed or the invoicer clicks to recalculate, the invoice date will be copied into the user defined invoice date field assuming:
- A date has been entered into the Invoice Date field.
- The invoicer has not manually entered a date in the user defined invoice date field. This will be deemed to be a default override and the system will retain the user entered date.
The default will only be applied during invoice creation: no date will default during invoice editing.
- Type = Posting Date
This default value is available when the ‘Date’ data type is selected for the ‘Invoice’ document type only.
When the Invoice Entry form is first opened by the invoicer, the user defined invoice date will pre-populate with the current (i.e. posting) date. The invoicer is able to change this default during invoice entry and if so, it will be deemed to be a default override and the system will retain the user entered date.
The default will only be applied during invoice creation: no date will default during invoice editing.
Auto Update
The Auto Update option is available when the Data Type of ‘Date’ is selected for an ‘Invoice’ document type only. This option will automatically update the user defined date field based on a future settlement event, irrespective of whether it is empty or contains a default or user entered value.
Click on the value displayed in the options panel (the default is ‘None’) to open the ‘Auto Update’ pop up window. A drop down list box will contain the following three value types for selection:
- Type = None
The date will not be automatically updated. This is the default.
- Type = Reconciliation
The date will automatically change when the Invoice Settlement Status moves to any reconciled and payable state. The date will update with the date the status was assigned. The following statuses are relevant:
- Reconciled
- Reconciled – pending full invoicing
- Force Settled
- Type = Final Approval
The date will automatically change when the invoice is finally approved. The date will update with the date the invoice exits the final task in the invoice settlement approval plan. If selected, this option will be ignored by any invoice not subject to invoice workflow approval.
Creating Field Options
Document User Fields can be set-up to support free text entry or selection from a drop-down list of values.
If values are not entered in the User Field Options section, a free form text box will be displayed for data entry, supporting up to 210 characters.
If values are entered in the User Field Options section, a drop down list box will be displayed containing these values, for data selection. User Field Options are available for all field definitions except when the ‘Date’ data type is selected for the ‘Invoice’ document type.
To create a list of values follow these steps:
- Highlight the User Field in the existing User Fields table. This can be done immediately after adding a new user field or by editing an existing user field.
- In the User Field Options section at the bottom of the Document User Field Definitions screen enter:
- Key – A unique database reference.
- Text – The description to be displayed in the drop down list box.
- Click the Add button to save the option.
- Repeat steps 2 and 3 above until all values that are required to appear in the drop down list box are entered.
- If you wish to clear the option, without saving or deleting data and remain in the Document User Field Definitions screen, click the Clear button.
- To delete a value, highlight it in the list of existing values box and click the Delete (X) icon.
Search and Filter
The User Field Definitions and Field Options tables will display 10 entries, sorted alphabetically by default but can be extended using the Show entries control in the top left hand corner of the table. Using the list box, choose an override to display 25, 50 or 100 entries. When more than one page is available, pagination controls will display the number of pages of entries and allow you to scroll or jump between those pages. A Quick filter provides a 'type ahead' text search, which automatically filters the entries in the table using the string of characters entered.
Editing Fields
Document user fields can be edited at any time. Select an existing user field from the user fields table.
If a number of fields exist, to expedite finding the field to edit, the table can be sorted by clicking on the column headers. Click again to sort alternately in ascending then descending order.
- Editing User Fields. All fields are editable by simply changing the field value and clicking the Update button.
- Editing User Field Options. To edit a user option (first select the user field from the user fields table), click on the existing value in the options table. Edit the field text (i.e. description) and click the Update button. Note that the field Key is not editable.
Deleting Fields
Deleting Fields. A field can be deleted only if it is not in use. Select the user field from the user fields table and click the Delete (X) icon. If the field has been used it will not be removed and an error message is displayed.
Deleting Field Options. A user field option can be deleted at any time. After selecting the user field from the user fields table, click on the option you wish to delete in the field options table and click the Delete (X) icon.
Navigation
P2P Admin