General Actions:
19.1.1 Approval Group Header
- Select the Approval Rules > Approval Rule Groups tab to open the Approval Rule Group window.
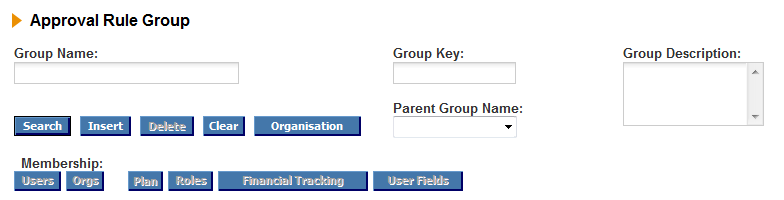
- Enter the following details to create and save the Approval Group Header
- Group Name (mandatory): The name of the group. This should easily identify the area of your organisation in which it is assigned.
- Group Key (mandatory): A unique database identifier. This is not used in the procurement GUI.
- The Key must be unique across both BRG’s and ARG’s. It is recommended that the letters BRG and ARG are used as part of the key to ensure uniqueness.
- Group Description (mandatory): Enter a long description to describe the content and assignments within the group
- Parent Group Name: Select an approval rule group to be the parent of this group to create a group hierarchy. Parent Groups are explained later in this section.
- Organisation: Optionally click the Organisation button to assign this group to an organisation level for Administration purposes. If you do not assign this group to an organisation it will be saved to your default administration profile organisation.
- The Organisation button will only be available to administrators who have the Organisation Override checkbox selected in their Administration Profile.
- Insert: When all the mandatory details have been provided click the ‘Insert’ button to add the group. Confirmation that the group has been saved will be displayed. At this stage only the group header - without assignments - has been created and saved.
- The next step is to assign users, plans and roles to the group.
Navigation
P2P Admin