General Actions:
8.2 Editing Non-Catalogue Items
- Navigate to your To Do list and select the appropriate document type from the Left Navigation Panel.
- Click on the document number to open the Approval Summary screen.
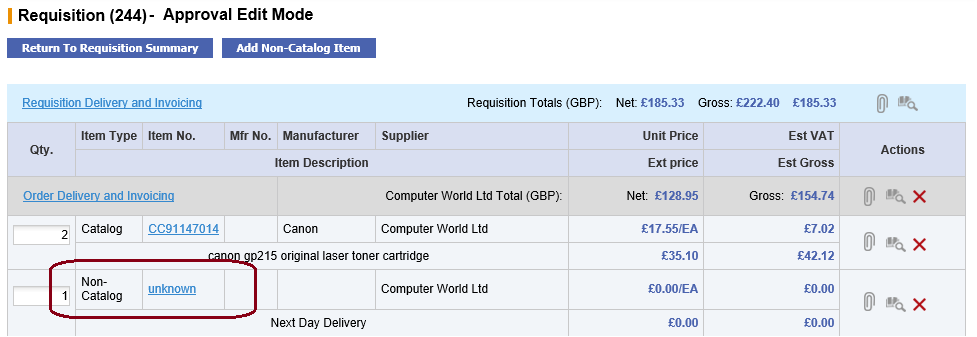
- In the Approval Summary screen click on the ‘Edit’ button to enter ‘Approval Edit Mode’.
- In the Approval Edit Mode screen click on the item number link to enter the ‘Update Non-Catalogue Item’ screen. If no item number has been entered by the requisitioner it will say 'unknown'.
- Review all the Non-Catalogue item attributes in the ‘Update Non-Catalogue Item’ screen. Remember that the Requisitioner may only have entered an item description.
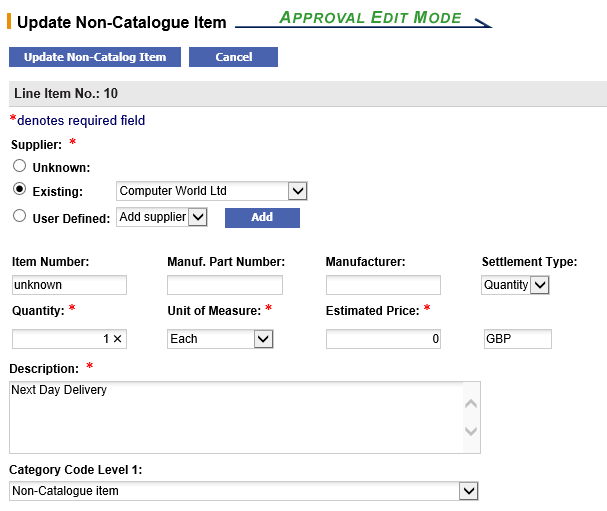
The following item attributes are available for editing, some of which are mandatory (marked with a red asterisk):- Supplier (Mandatory). One of three selections will be made.
- Existing. If the supplier is already assigned it can be changed by either selecting from the list box or clicking the ‘Supplier Lookup’ button and using the supplier search tool to select an alternative.
- Unknown. If the supplier is ‘Unknown’ one MUST be selected. Click the ‘Existing’ radio button and assign a supplier from the list box or through the supplier lookup.
- User Defined. If this option is available, create an ad-hoc supplier by clicking the 'Add' button (see User Defined Suppliers).
- Item Number. Enter the supplier’s part number (sku code).
- Manufacturer Part Number. Enter the manufacturer part number of known.
- Manufacturer. Enter the name of the manufacturer if known.
- Settlement Type. Select either ‘Quantity’ or ‘Amount’ from the drop down box to determine how goods are to be receipted and matched against this item.
- Quantity: goods are received by quantity.
- Amount: goods are received by value.
- Quantity (Mandatory). Enter the number of items to be purchase. The default is one.
- Unit of Measure (Mandatory). Enter the unit of measure from the drop down box. The default is ‘Each’.
- Estimated Price (Mandatory). Enter the price for this item. The default is ‘Nil’.
- Description (Mandatory). Update the item description.
- Category Code. Optionally select the first and second level product classification code (e.g. UNSPSC). Note that this selection may have been made mandatory by your system administrator.
- Internal Comments. Enter any internal comments to be viewed by the requisitioner and other approvers.
- External Comments. Enter any external comments to appear printed on the purchase order at line level.
- When you have finished making your changes click the ‘Update Non-Catalogue Item’ button to return to the ‘Approval Edit Mode’ screen. If you do not wish to update the item and save your changes, click the 'Cancel' button.
- If there are no further items to edit and you have completed the review of comments, financial tracking codes and delivery and invoicing data, click the ‘Return to Requisition Summary’ button (if you are editing in a requisition) or ‘Submit Edits’ button (if you are editing an order request).
The audit trail will be updated with all the changes that you have made and you are now able to complete approval of the document in the usual way.
Navigation
P2P Approvals