General Actions:
9.2.1 Requisition Approval
Original blanket orders submitted through a requisition approval plan can be:
- Approved without changes.
- Returned to the requisitioner without changes.
- Edited and returned to the requisitioner.
- Edited and approved.
- Cancelled.
9.2.1.1 Approve without Changes
In your Requisitions To Do list click on the Requisition ID to open the ‘Requisition Approval Summary’ screen.
If you are happy that the blanket order is correct and do not wish to edit or return it to the originator, simply click the ‘Approve’ button.
The document will continue through the approval process and will move onto the next workflow step if there is one. If there are no more approval steps in the plan, approving the requisition will result in an order being created and either transmitted to the supplier or sent for further approval under an order request approval plan.
9.2.1.2 Return without Changes
In your Requisitions To Do list click on the Requisition ID to open the ‘Requisition Approval Summary’ screen.
If, after review, you are not happy with the document and wish to reject it back to the requisitioner, click the ‘Return To Requisitioner’ button. You must enter mandatory comments (e.g. the reason for return) in the ‘Comments/Feedback’ box A notification email message will be sent to the requisitioner informing them of your action.
The document will not continue through the approval process until the requisitioner has made the appropriate changes and either cancelled or re-submitted it.
If, after the requisitioner updates it, the document still falls within the criteria required for your approval, it will be sent to you a second time for approval. This process will continue until you finally approve the document or the requisitioner cancels the blanket order.
9.2.1.3 Edit
In your Requisitions To Do list click on the Requisition ID to open the ‘Requisition Approval Summary’ screen.
Depending on the rights given by your system administrator you will be able to either fully or partially edit the details of the blanket order.
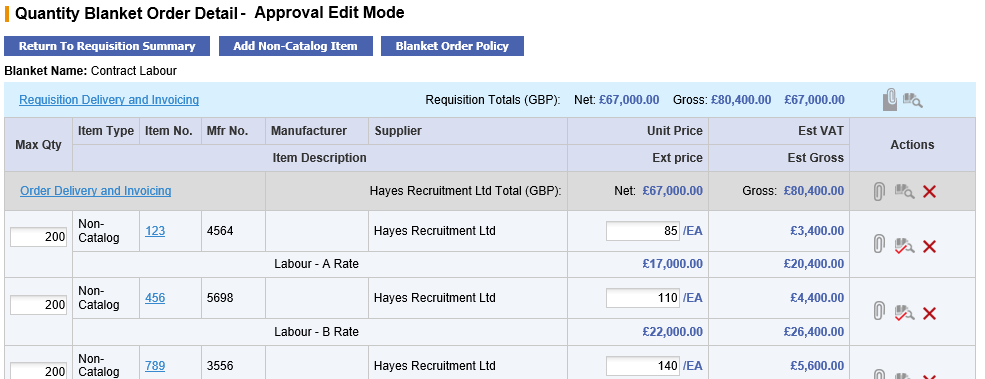
- Click on the ‘Edit’ button to enter blanket order ‘Approval Edit Mode’.
The following editing tasks can be performed.
- Update Item Quantities
To update item quantities overtype the existing quantities in the ‘Qty’ column. Ensure you tab out of the box after typing to allow the document to update.
The following configuration must be taken into consideration when updating item quantities:- Decimal Quantities. Check whether decimals are allowed for your organisation.
- Minimum Order Quantities. It will not be possible to reduce a quantity below the item’s minimum order quantity. If you do so, an error message will display.
- Maximum Order Quantity. It will not be possible to increase a quantity above the item’s maximum order quantity. If you do so, an error message will display.
- Not to Exceed Amount. If the blanket order is amount based with the ‘Item Amounts’ processing condition configured, it will not be possible to alter the item quantities and make the sum of the line item totals different to the Not to Exceed Amount.
- Update Prices
Prices can be updated by overtyping the existing price in the ‘Unit Price’ column. Ensure you tab out of the box after typing to allow the document to update. (Note. The ability to edit item prices is specific to blanket orders.)
If the blanket order is amount based with the ‘Item Amounts’ processing condition configured, it will not be possible to alter the item unit prices and make the sum of the line item totals different to the Not to Exceed amount. - Update Delivery and Invoicing Information
Clicking on the ‘Order Delivery and Invoicing’ link at the top of the page will enable editing of delivery, payment and invoicing options.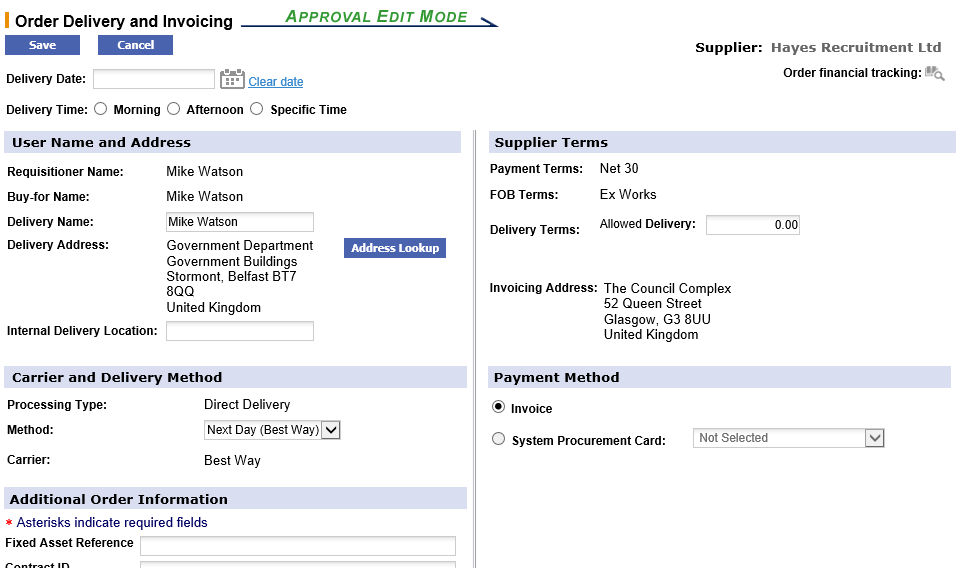
From here the following information can be changed:- Change the Delivery Address by clicking the ‘Address Lookup’ button.
- Add or update the Buy-for User's GSRN.
- Add an Internal Delivery Location by typing it in the edit box.
- Change the Delivery Date by clicking on the calendar icon.
- Change or add a Delivery Time by selecting from the radio buttons.
- Change Carrier and Delivery Method by selecting alternatives (if available) from the drop down list box.
- Enter Additional Order Information (if available
- Change the Payment Method and optionally select procurement card details.
- Add Additional Catalogue Items
To add items to the blanket order navigate to the Item Search page and add items in the normal way. Alternatively an item can be added directly to the requisition using ‘Direct Item Entry’ at the foot of the requisition. Note that the choice of supplier is fixed since a blanket order can be assigned to a single supplier only. You must have requisitioning rights and access to the appropriate blanket supplier’s catalogue to perform this action.
After adding a catalogue item, to return to the Blanket Order Detail screen to resume editing, click on the ‘Basket’ tab. - Comments and Attachments
Add or update attachments and comments by clicking on the paperclip icon. Comments and attachments can be edited at one of three levels:- Requisition Level. Click the paperclip icon in the requisition header to open and edit comments and attachments applied to the whole requisition. Since a blanket represents a single order, these comments and attachments are effectively the same as those applied at order level.
- Order Level. Click the paperclip icon in the order header to open and edit comments and attachments applied at the purchase order header level.
- Line Level. Click the paperclip icon at line level to open and edit comments and attachments applied to the line item only.
Additional Item Information fields may also be available at line level. These extended fields provide for free text input or list box selection and can be optionally made mandatory. They capture item specific detail that can be used to add information to purchase orders, provide data for integration files or used for approval routing purposes.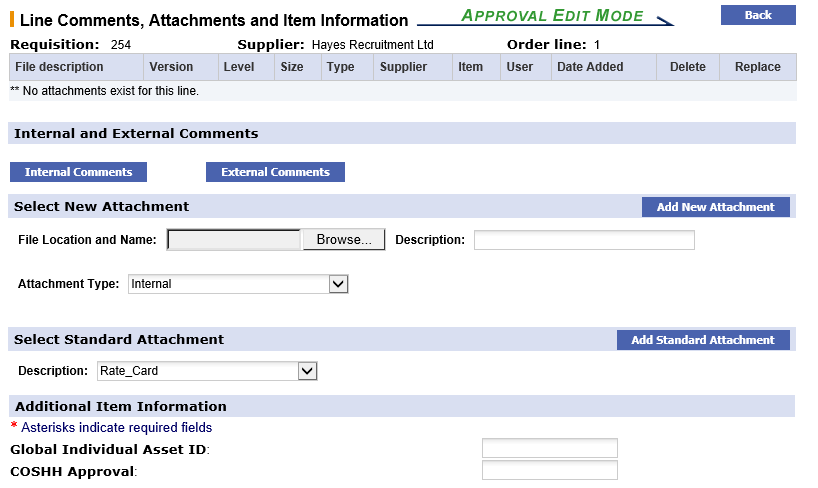
- Delete
Delete an order or an order line by clicking on the red delete icon. - Financial Tracking
Change financial tracking and VAT treatment details by clicking on the financial tracking icon at one of the following levels:- Requisition or order level - to change details for the entire blanket order.
- Line level - to change details and optionally split charges for the line only.
2. Optionally add a Non-Catalogue Item to the Blanket Order by clicking on the ‘Add Non-Catalogue Item’ button (see Non-Catalogue Items).
3. To edit the Blanket Order Policy click on the ‘Blanket Order Policy’ button to open the blanket order policy screen.
All blanket policy can be edited with the exception of the supplier. Policy Terms, Processing Conditions and Notification Controls can all be updated: refer to the Blanket Order pages of the User Guide for additional information.
4. To edit Blanket Order Permissions, from within the Blanket Order Policy screen, click on the ‘Blanket Order Permissions’ button. Two permissions can be set:
- Release Permission. Select business groups to define which users will be granted permission to create blanket releases. The default is 'Private', allowing only the author of the blanket to create blanket releases.
- Maintenance Permission. Select business groups to define which users will be granted administration rights to maintain this blanket. The default is 'Private', allowing only the author of the blanket to maintain this blanket order.
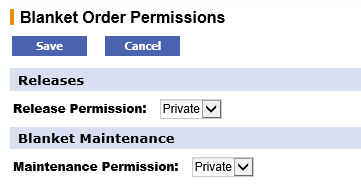
After making changes to Blanket Order Permissions select either ‘Save’ to save your changes and return to the Blanket Order Policy screen or ‘Cancel’ to return to the Blanket Order Policy screen without saving changes.
5. When all changes to blanket policy and permissions have been completed click on the ‘Blanket Order Detail’ button to save changes and resume editing activity in the Blanket Order Detail screen.
If you do not wish to save the changes to blanket policy and permissions click on the ‘Cancel’ button in the Blanket Order Policy screen.
6. When all changes have been made to your satisfaction, click on the ‘Return To Requisition Summary’ button. The Requisition Approval Summary screen will once again be displayed.
Notice that the audit trail will have been updated for all of the changes that you have saved.
7. To complete editing there are two options:
- Click ‘Approve’. The blanket order will move forwards in the workflow to its next step.
- Click ‘Return To Requisitioner’. The blanket order will not move forwards in the workflow but return to the start, pending the action of the requisitioner. Mandatory Comments/Feedback is required if the blanket is returned.
9.2.1.4 Cancel
In your Requisitions To Do list click on the Requisition ID to open the ‘Requisition Approval Summary’ screen.
A requisition can only be cancelled by the requisitioner themselves and therefore you will only be able to cancel your own documents. Approvers and Administrators are not able to cancel other users requisitions - they must be returned back to the requisitioner for cancellation.
From within the Requisition Approval Summary screen enter cancellation reason in the 'Comments/Feedback' text box and click on the 'Cancel Requisition' button. The message ‘Requisition Cancelled’ will be seen at the top of the screen and the audit trail updated accordingly. Use the ‘Back’ button to return to your To Do list where you may continue with further approval activities.
Cancelled requisitions will not be deleted from PECOS P2P but their status will be updated to ‘Requisition Cancelled’ and no further activities will be able to be performed. The only action that can be performed by the original requisitioner is to review the document details and copy them into a new shopping basket.
Navigation
P2P Approvals