General Actions:
6.5 Edit Change Orders
Editing Permissions are contained in the approval step of the change order approval plan and may include any combination of the following document content:
- Items and Quantities
- Accounting Information
- Delivery and Invoicing Information
- Comments and Attachments
- VAT Treatment
If no editing permissions are granted by the approval plan, the edit button will not be displayed and no editing rights will be available.
- In the PO Change Approval Summary screen click on the ‘Edit’ button to enter ‘Approval Edit Mode’.

- The PO Change Transmission Detail is displayed to indicate whether the change order is to be sent to the supplier by email or fax. If permitted, these details may be changed and edited. If these details are greyed, editing is not permitted.
- Two radio buttons are provided to select order transmission options. The order changes will always be saved and a change order created but it is possible to elect to not send a copy of the order to the supplier.
- Whilst in edit mode the following actions can be performed.
- Change Item Quantities. Change item quantities by overtyping the existing quantity in the ‘Qty’ column. Ensure you tab out of the box after typing to allow the document to update.
The following configuration must be taken into consideration when updating item quantities:- Decimal quantities. Check whether decimals are allowed for your organisation.
- Minimum Order quantities. It will not be possible to reduce a quantity below the item’s minimum order quantity. If you do so, an error message will display.
- Maximum Order Quantity. It will not be possible to increase a quantity above the item’s maximum order quantity. If you do so, an error message will display.
- Add Catalogue Items Add items in the normal way: navigate to the Item Search screen; use the Quick Search at the top of the screen; or use ‘Direct Item Entry’ at the foot of the requisition. Catalogue search will be restricted to the supplier for whom the order is to be placed. Also note that you must have requisitioning rights and access to the supplier's catalogue to perform this action.
- Order Delivery and Invoicing Information. To change Delivery and Invoicing details click on the ‘Order Delivery and Invoicing’ link at the top of the order section.
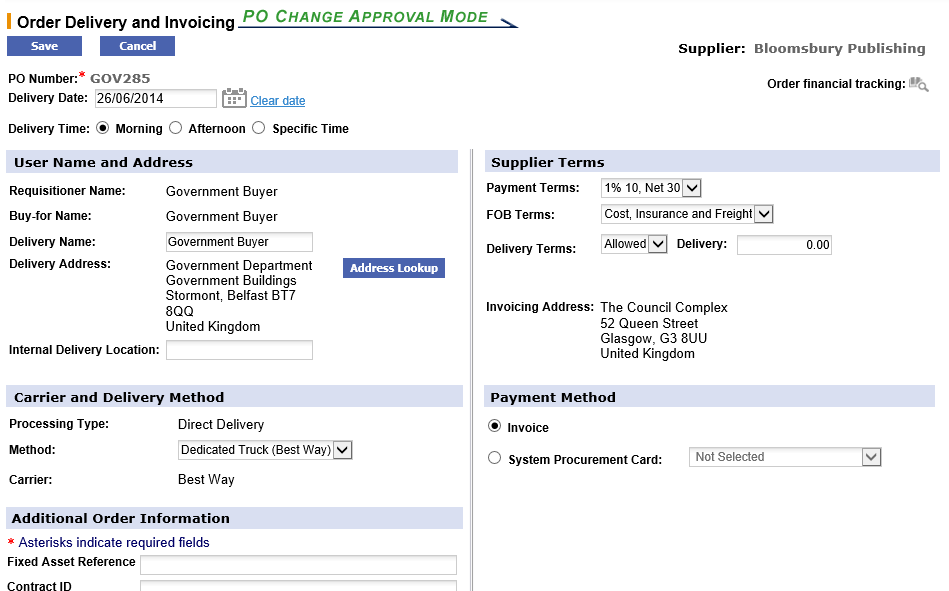
From here the following information can be changed for the order:- Change the Delivery Address by clicking the ‘Address Lookup’ button.
- Change the Delivery Date and Time. Note that the delivery date might be set as mandatory and if so should not be cleared.
- Add or change the Buy-for User's GSRN.
- Add or change the Internal Delivery Location by editing the text box.
- Change the Delivery Method by selecting an alternative from the drop down selection box. This will update on the purchase order.
- Edit any Additional Order Information. These boxes will be either text boxes or drop down list boxes, depending on how your system administrator has defined them.
- Change Payment or Delivery Terms if available.
- Edit or enter estimated Delivery charges. Note that the value of estimated delivery will be included in the document total for approval routing purposes but is not added as an order line item.
- Indicate if the order is to be tax exempt by checking the ‘Tax Exempt’ box, if available.
- Change the Payment Method and optionally select procurement card details.
- Comments and Attachments. Add or update attachments and comments by clicking on the paperclip icon. Comments and attachments can be updated at one of two levels for the change order.
- Order Level. Click the paperclip icon in the order header to open and edit comments and attachments applied to the individual purchase order document:
- Line Level. Click the paperclip icon at line level to open and edit comments and attachments and also additional item information applied to the line item only:
- Delete. Delete a document line by clicking on the red delete icon on the line you wish to delete. All lines for an entire order can be deleted by clicking on the icon in the order summary line.
- Financial Tracking & VAT. Change financial tracking and VAT treatment details by clicking on the financial tracking icon at one of the following levels:
- Order level - to change details for the entire Order.
- Line level - to change details and optionally split charges for the line only.
- Add a Non-Catalogue Item to the order by clicking on the ‘add non-catalogue item’ button.
- Change Item Quantities. Change item quantities by overtyping the existing quantity in the ‘Qty’ column. Ensure you tab out of the box after typing to allow the document to update.
- Save or Cancel Changes: When all changes have been made to your satisfaction, click on the ‘Submit Edits’ button to save your changes. Notice that the audit trail will have been updated for all of the changes that you have saved. If you do not wish to save your edits, click on the ‘Cancel Edits’ button. Your changes will not be saved.
- To complete the editing action you have two options:
- Click ‘Approve’. The change order will move forwards in the approval process to the next workflow step
- Click ‘Return To Requisitioner’. Mandatory comments must be entered. The change order will be returned to the requisitioner with an email message containing your comments. The order will not move forwards in the approval process but upon optional editing and resubmission by the requisitioner, will return to the start.
Navigation
P2P Approvals