General Actions:
4.1 Adding Non-Catalogue Items
To add a non-catalogue item or service to your requisition, follow these steps.
- Click the ‘Basket’ tab to open your Shopping Basket.
- At the top of the Shopping Basket, click the ‘add non-catalogue item’ button to open the Add Non-Catalogue Item screen.
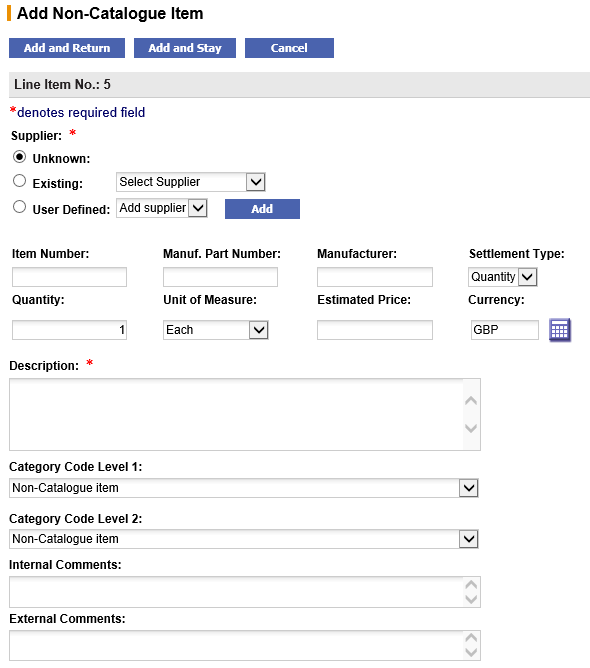
- Enter Item Description (mandatory).
Type an accurate and complete description of the item you require in the Description field. The item description field is mandatory.
- Enter Supplier Details (mandatory with default).
Choose a supplier for this item by clicking the appropriate supplier radio button. The default supplier selection is ‘Unknown’ which may be kept if you do not know who the supplier of this item is to be. Alternatively select an existing supplier or create an ad hoc profile: these options are explained below.
The suppliers available for you to purchase non-catalogue items from will be defined by your system administrators and may be restricted by ‘supplier type’. Catalogue suppliers may not necessarily be available for selection if you are not authorised to purchase non-contracted items from them.
There are three types of supplier that you can select:
i) Unknown (default) - Select this option when you do not know the supplier for this item. The item will be added to an ‘unknown’ supplier purchase order that will be routed for sourcing and editing by your procurement department. Do not leave the supplier as unknown if you do not have an approval plan assigned to your user profile: it will not be possible to submit the requisition. See the section ‘Unknown Suppliers’ at the end of this section for more detail.ii) Existing - Choose an existing supplier by either clicking on the supplier lookup button or selecting from the drop down list box. One of these lookup options will have been set by your system administrator.
- Supplier Lookup: Click on the supplier lookup button and use the supplier search tool to identify the supplier this item is to be purchased from. A lookup button will be used when the list of available suppliers is very long.
- List Box: Click in the drop down list box to find the supplier from whom this item is to be purchased.
iii) User Defined - If you have permission from your system administrator, you may add a new ad hoc supplier to the system for use now and in the future (see ‘Add a User Defined Supplier’).
- Enter Item Details.
You may optionally add additional information about the item in the fields provided. These additional fields represent catalogue fields and although not required, entering as much information as possible will assist your approver (probably your purchasing department) to source the item for you.
Note that the selection of Category Codes may be made mandatory for your organisation.
Available fields:
- Item Number – Enter the supplier part number.
- Manufacturer – Enter the name of the manufacturer.
- Manufacturer Part Number – Enter the manufacturer’s part number.
- Quantity – Enter the quantity of the item required up to six decimal places (if supported by your organisation). The default quantity is one.
- Unit of Measure – Choose the unit of measure from the drop down list box. The default is ‘Each’.
- Estimated Price – Enter the price of the item if known. If the price of the item is unknown this field may be left blank and the item will be added to your requisition with a zero value.
- Currency – Displays a default currency based on the supplier selected (i.e. this will display the default currency of the supplier). If no supplier is selected (i.e. 'Unknown') the currency will default to that of your user profile (i.e. your user/organisational default).
- Settlement Type – Select the settlement type of ‘Amount’ if the item is to be receipted and invoiced in value rather than quantity. This is particularly useful when adding a Non catalogue item to a Blanket Order. The default settlement type is ‘Quantity’.
- Category Codes (optionally mandatory) – This allows you to choose the first two levels of product category code for this item. Firstly select the top level code and wait for the second level selections to validate before making the second level selection. The product category (also called the product classification code: e.g. the UNSPSC) is used for a number of reasons and its selection is highly recommended. Category codes are selected automatically for all catalogue items and are used for:
- Reporting purposes
- Approval routing purposes
- Define correct item accounting defaults
- Define a correct VAT treatment default
- Internal Comments - Add comments to be routed internally throughout the approval process. This box can be used to add additional information for the benefit of a purchasing department who may need to edit and update the item prior to ordering.
- External Comments – Add item level comments to appear on the purchase order for the benefit of the supplier.
- Add the Item.
Scroll back to the top of the page and click on one of the add buttons:
Add and return: will add this item to your basket and return you to the shopping basket. It is assumed this is the only or final non-catalogue item to be added.
Add and stay: will add this item to your basket and you will remain in the ‘add non catalogue item’ screen to add another non-catalogue item.
- Mixed Currencies.
Note that mixed currencies are not allowed in a requisition and therefore it will not be possible to add a Non-Catalogue item in a currency that differs from the existing 'Requisition Currency'. If an item has already been added to the shopping basket (thereby setting the 'Requisition Currency') and the item being added is for a supplier in a different currency, an error message will display at the top of the page: " Mixed currencies are not allowed in a requisition. The requisition currency is XXX and this supplier currency is YYY. You must create a new requisition for these items.".
- Choose VAT Treatment Default.
If you have selected category codes (their selection might be mandatory) for this item, its VAT treatment will be validated. PECOS will check to see if any VAT treatment default is assigned to the product category code.
You have the option to either accept or decline any category code VAT default assignment by choosing a response from the VAT Treatment validation pop up box:
- OK: Add the item and apply any VAT treatment associated to the product category code. Any user or organisational default VAT treatment will be overridden.
- Cancel: Add the item but DO NOT apply any VAT treatment associated to the category code. Any user or organisational default VAT treatment will NOT be overridden.
Navigation
P2P Procurement