General Actions:
PECOS P2P » 5. Manage the Shopping Basket » 5.4 Delivery and Invoicing » 5.4.1 Requisition Level Delivery and Invoicing
5.4.1 Requisition Level Delivery and Invoicing
Changing Delivery and Invoicing details at requisition level will update all orders on your requisition.
At Requisition level the following tasks can be performed:
- Enter a Delivery Date and Time
- Select a Buy-For user
- Add or change the Requisitioner or Buy-for GSRN
- Change Delivery Name and Address
- Select Requisition Processing Conditions (optional)
- Add Additional Order Information
- Change Payment Method
- Add a Personal Procurement Card
- View and Update Requisition Financial Tracking
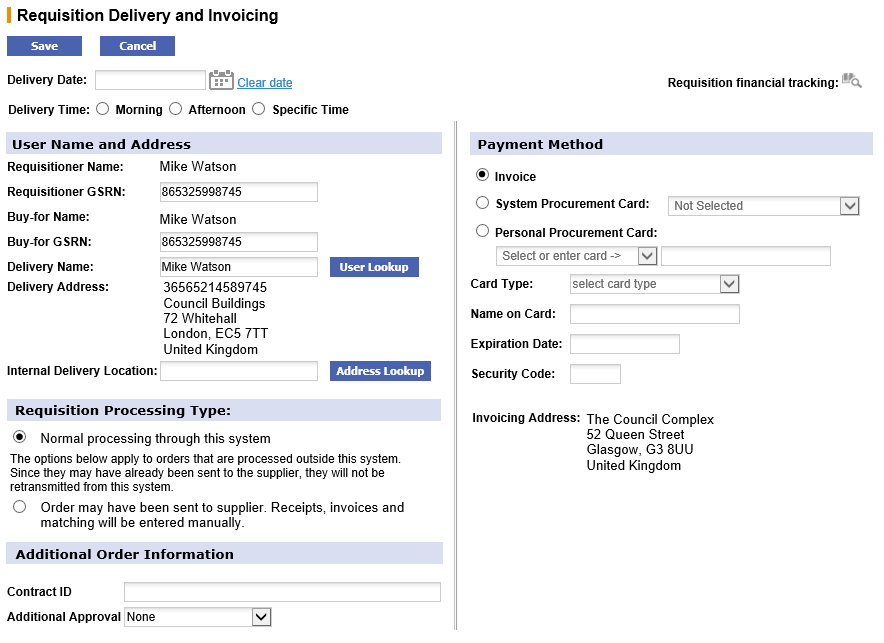
Accessing the Requisition Delivery and Invoicing screen
- Click the Basket tab to display the details of your current shopping basket.
- Click on the words Requisition Delivery and Invoicing on the requisition level header to open the requisition delivery and invoicing screen.
Delivery Date
The Delivery Date field allows you to enter the date you would like to receive all the items on your Requisition. If you enter a date here, this date will be printed on all your supplier’s purchase orders from this requisition so that they know when to make delivery.
Default Dates:
Your organisation may have assigned mandatory delivery dates or default delivery dates to be auto generated and assigned:
- Delivery dates may be made mandatory for all orders or for specific supplier’s orders only. If this is the case the field will be marked as mandatory in the order delivery and invoicing screens (see below) and you will not be able to submit the requisition until dates have been entered.
- Delivery dates may be set to be generated and defaulted automatically. One of two options will be applied:
- Requisition. The delivery date will be calculated based on the date of the requisition and added to the order request upon submission of the requisition. It will not display until the requisition is submitted but will display in order requests after the requisition is submitted.
- Purchase Order. The delivery date will be calculated based on the date of order transmission and added to the Purchase Order when it is transmitted. It will not display in the requisition or order request prior to transmission to the supplier.
If a date is manually entered this will always override any default setting.
If no default is set and no dates are entered, delivery dates will not be printed on your purchase orders.
To enter a Delivery Date:
- Click on Requisition Delivery and Invoicing in the requisition header. The Requisition Delivery and Invoicing screen appears

- To select a delivery date, click on the Date Picker to open up the calendar: A pop-up calendar will appear.
- To find a date in a month other than the current month, use the arrows in the upper corners of the pop up window to select the correct month and year.
 The forward arrow symbol will move the month forwards
 The backward arrow symbol will move the month backward
 The forward circled arrow symbol will move the year forwards
 The backward circled arrow symbol will move the year backwards
Click on the date required to select it. The date will automatically populate the Delivery Date field.
If you make a mistake, click Clear date to reset the field. - Optionally select a Delivery Time by clicking the appropriate radio button:
- Morning – select to display ‘Morning’ as the delivery time on the purchase order
- Afternoon – select to display ‘Afternoon’ as the delivery time on the purchase order
- Specific Time – selection will display an additional list box and ‘AM’ and ‘PM’ buttons. Select a number from 1 to 12 from the list box to indicate a time and then either ‘AM’ or ‘PM’ to indicate morning or afternoon delivery.
Buy-For Name
If you have permission, you can create requisitions for other users in your organisation by selecting a ‘Buy-for-Name’. Buy-for functionality allows you to purchase items on behalf of another person. By default the Buy-for user is yourself (i.e. ‘requisitioner’).
When you buy for another user, PECOS will automatically copy the buy for user’s purchasing profile onto all orders on your requisition. The following defaults will be updated with those of the new buy-for user:
- Delivery Address
- Default Accounting
- User Name and GSRN
- Payment Method
- Approval Routing
Although PECOS will automatically make these changes, you will still have the ability to override them at order and line level if required.
The Buy-for GSRN (Global Service Relationship Number) is an optional, alternate user identification code or reference number. If one is provided, it will default from the Buy-for user profile but may optionally be entered or edited at requisition level.
To Select Buy-for at requisition level:
- In your Shopping basket click on Requisition Delivery and Invoicing in the requisition header. The Requisition Delivery and Invoicing screen will open.
- From the Requisition Delivery and Invoicing screen, click the User Lookup button next to the Buy-For Name text. The Look Up Buy-for User Name and Address screen will open.
- If you wish, enter a partial name in the search box and click the Search button to view all users you have permission to buy for. All users who match your search will be displayed. Alternatively you may leave the search box empty to get a list of all users you have Buy-for permissions for. The users you have permission to Buy-for will be listed.
- Click on the Select button next to the user you are buying on behalf of. The Requisition Delivery and Invoicing screen will reappear.
You will notice that the user you have selected will appear as the Buy-for Name: and their user profile defaults will have over-written yours. These changes will be replicated down to all orders on your requisition.
Delivery Address
The address to which your goods will be delivered is defaulted from your user profile and will appear printed on each supplier purchase order. If any of this information is incorrect or requires updating, speak to your system administrator who will amend your user defaults.
The default delivery detail contains the following fields, any of which may be changed:
Delivery Name (mandatory): This is a text box that can be overtyped
Delivery Address (mandatory): Click on the address lookup button (see below)
Internal Delivery Location (optional): Enter any additional delivery information in this text box.
To Change Delivery Address:
- Click on Requisition Delivery and Invoicing in the requisition header. The Requisition Delivery and Invoicing screen appears.
- Your default address will populate the Delivery Address: field. Click on the address lookup button. The Address Lookup page appears:
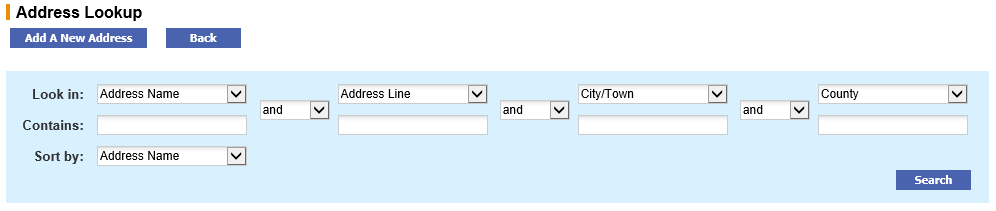
- To search for an address you may use the address list search box by entering search criteria for different address fields. Alternatively you may leave the search tool blank and click the search button. The Search Results will populate on the right hand side of the screen. The search results displayed are limited to the first 100 records.
There may be a great deal of address data loaded into PECOS P2P and it is therefore recommended that you refine your searches by using the search tool provided. By refining your search in this way, you will narrow down the list of results and find the required address quicker
It is likely that your system administrator will have created your addresses with consistent and logical names. You may therefore find it easiest to search for addresses using the Address Name field.
- Select the appropriate address by clicking on the select icon. The Requisition Delivery and Invoicing screen reappears with your address changed.
To Add a New Address
Permission to create new addresses in PECOS is occasionally granted to certain users. If you have permission to create addresses you will see an ‘Add New Address’ button on the Address Lookup page.
- Click on Requisition Delivery and Invoicing in the requisition header to open the Requisition Delivery and Invoicing screen.
- Click on the Address Lookup button to open the Address Lookup screen.
- Click the Add A New Address button to open the Add New Address screen.
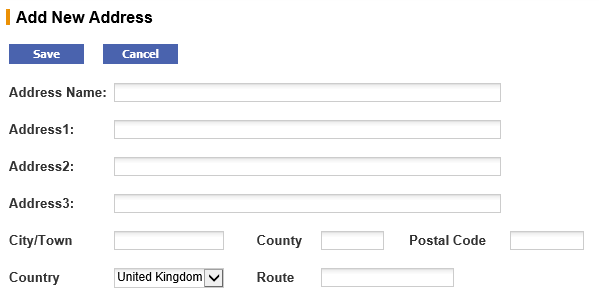
- Enter the address information in the fields provided.
- Click the Save button to add the address into PECOS P2P. The Address Lookup screen reappears showing your new address.
- To select your new address click the select icon. The Requisition Delivery and Invoicing screen will reappear.
Note. Ad hoc addresses can only be edited or deleted by a system administrator. If you make an error while creating an ad hoc address, contact your system administrator.
Requisitioning Processing Type
To indicate different processing types for a requisition, three Radio Buttons may be made available to you. Choose the appropriate one for the requisition as required. Each condition is defined in detail below.
These processing conditions are only available at the requisition level.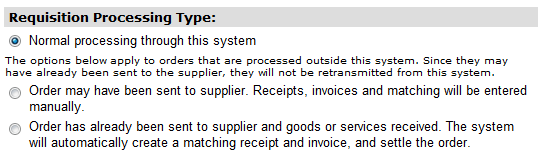
- Normal processing through the system – Normal workflow and order transmission will be followed. This is the default setting.
- Order Processing outside the system – When an order has already been placed or manually sent to a supplier. The processing of receipts, invoices and matching is still required. Note that the order will not be sent to the supplier.
For example an exceptional purchase may have been made manually outside of PECOS (possibly also from a local supplier who had not been adopted into the system).
- Processing outside this system is complete – When an order has already been placed or manually sent to a supplier and the processing of receipts, invoices and matching is not required. The order is recorded for record keeping purposes only and will not be sent to the supplier.
For example a field engineer has made an emergency purchase by procurement card.
Additional Order Information
A number of User-Defined fields can be displayed in the Additional Order Information section of the requisition delivery and invoicing screen. Depending on the configuration of your system, there may be one or more of these fields to record additional order information. These may include Work Order numbers, Project Codes, Contract Details or additional accounting information.
Note that if data has been entered into additional order information fields at order level (possibly due to a default value being used in a user defined field) a message will be displayed indicating that this is the case: “Order-level fields are in effect.” This message is displayed to prevent you from entering a requisition level value and over-writing any existing order level entries.
Your System Administrator will format these fields according to your business requirements:
- Data Type: The field might be validated to accept only whole numbers, decimals or text.
- Mandatory: The field might require mandatory completion. If this is the case a warning message will be displayed prior to submitting the requisition.
- Field Options: The additional field(s) might be configured as a text box or as a drop down list box for you to select a pre-defined value.
PECOS P2P will save the information you enter for each purchase order. The data entered might be used for approval routing or management reporting purposes.
Payment Method
The Requisition Delivery and Invoicing screen will be automatically populated with your default payment method. If you have access to other payment methods however, you can select them here.
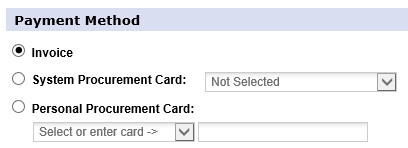
The methods available are:
- Invoice – Select this if you are expecting to pay for your goods by invoice.
- System Procurement Card – Select a System Procurement Card (which already exists in the system) by choosing one from the dropdown list. Goods will not be paid on an invoice.
- Personal Procurement Card – To pay for your requisition using a personal procurement card, click the radio button (not all users will see this option). The data fields shown below will become active.
Create a Personal Procurement Card
The ability to enter personal procurement card details will be granted through your user profile settings. In the Payment Method section of the delivery and invoicing screen a ‘Personal Procurement Card’ option must be available.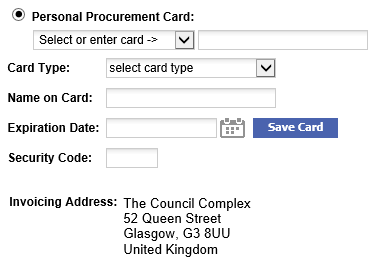
Enter the following data:
- Card Number: Enter your card number or select a previously saved card number from the drop down box.
- Card Type: Select the card type from the drop down selection box. Note that the card number will be validated against the card type.
To enter a notional/imaginary card into the system for testing or training purposes, choose ‘Ghost Card’ from the Card Type drop down box. This card type will not be validated against the card number.
- Name: Enter the name as it appears on your card.
- Expiration Date: Click on the calendar icon to select an expiration date.
- Security Code (CVV): Optionally enter your card’s security code. This field may be made mandatory and if so a warning message will be displayed if it is not completed.
If you click Save Card this card will be available to you for future purchases. If you do not wish PECOS to store this information beyond the current transaction, do not click the Save Card button. Please note that the card details are not validated for uniqueness and therefore it is advisable to check that the card being saved is not a duplicate of a card previously used.
Compliance to PCI Data Security Standardsis available and the CVV2 field can be either masked or removed. Your system administrator will ensure your site is configured appropriately. The screen below shows how the CVV2 value is masked upon input.
Invoicing Address
The Requisition Delivery and Invoicing screen will be automatically populated with your default invoice address. This address will appear on all of your purchase orders as the address to which your suppliers will send their invoices. It cannot be edited within the requisition. If your invoice address is incorrect you will need to speak to your system administrator for it to be changed.
Navigation
P2P Procurement