General Actions:
12.4 Processing Receipts
This section explains the steps involved in receipting items.
- Click on the Documents tab to open the document search page.
- Enter search criteria to find the purchase order you wish to receive (see Document Search).
- The Receipts screen can be accessed in one of two ways:
- In the search results, click on the receive icon in the Actions column.
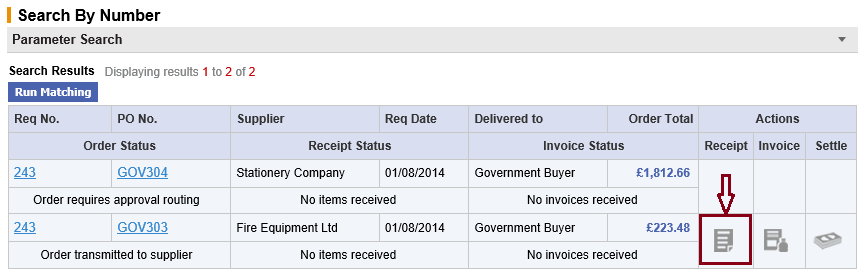
- Click on the PO Number to open the Purchase Order Status Summary screen. Next click the ‘Receipt’ button at the top of the page.

The Receive Items page will open for the order that was selected. The receipt form contains all the information that was on the original order to prevent you having to re-type any order information. Review the order details to confirm that you have selected the correct order.
- In the search results, click on the receive icon in the Actions column.
- In the receipt detail section you must enter three mandatory pieces of information.
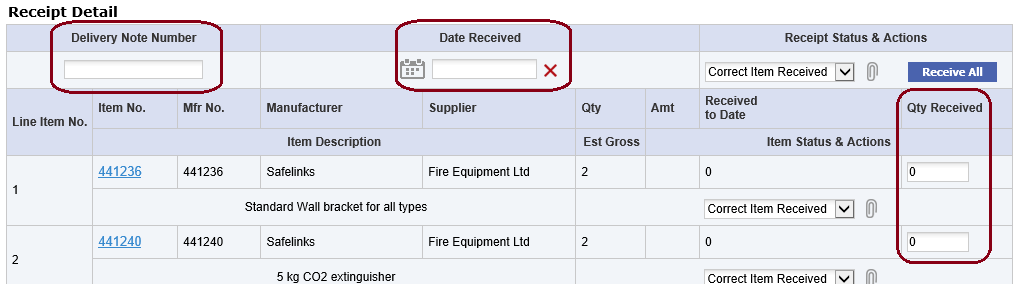
- Delivery Note Number: (Goods Receipt Note or Packing Slip reference number)
- This field is alpha-numeric
- The number entered must be unique for each purchase order: i.e. each receipting action must have a different reference
- Maximum field length is 15
- If no delivery reference number is received the field may be left blank if the ‘No Delivery Note Number’ status is chosen (see below).
- Date Received:
 Click on the date picker to open the calendar window.
When the Calendar opens it can be incremented and decremented by month and year by clicking on the arrows in the header bar. To select a date, click on it. The calendar will close and the date selected will populate the Date Received field.
 The forward arrow symbol will move the month forwards
 The backward arrow symbol will move the month backward
 The forward circled arrow symbol will move the year forwards
 The backward circled arrow symbol will move the year backwards
Click on the date required to select it. The date will automatically populate the Date field. Use the red delete icon to clear the date if you wish to make a change.- The receipt date will be validated and future dates are not allowed. Enter a date that is the current date or before.
- Quantity Received: Enter the actual quantity of items that have been delivered.
- The quantity can be a decimal of up to six decimal places. (Note that decimal numbering must be enabled for your organisation.)
- The quantity entered is not validated and may be greater or less than the quantity ordered (see Over Receiving).
- It is possible to automatically allocate a receipt quantity by clicking the ‘receive all’ button. PECOS P2P will populate the quantity box for every line on the order with a quantity equal to the receipt balance remaining for the line. The receipt quantity is calculated as: Order Quantity less Received to Date.
Use the ‘receive all’ button when you have a few items on a large order that have not been received. Click ‘receive all’ and then change the non-receipted lines as an exception: remember all quantities are editable until you click the complete receipt button.
- Delivery Note Number: (Goods Receipt Note or Packing Slip reference number)
- You may enter an optional status at header level (Receipt Status) or for each line (Item Status).
- Receipt Status options are provided for selection. Click on the drop down box to select the one that is relevant.
- If ‘No Delivery Note’ is selected at header level, the Delivery Note Number field (see 5a above) may be left empty.
- Statuses are saved in the receipt history
- Header level receipt status appears in the audit trail
- You may enter optional Comments and Attachments at the header or line level.
 Click on the attachment icon (paper clip) to open the comments and attachment screen.
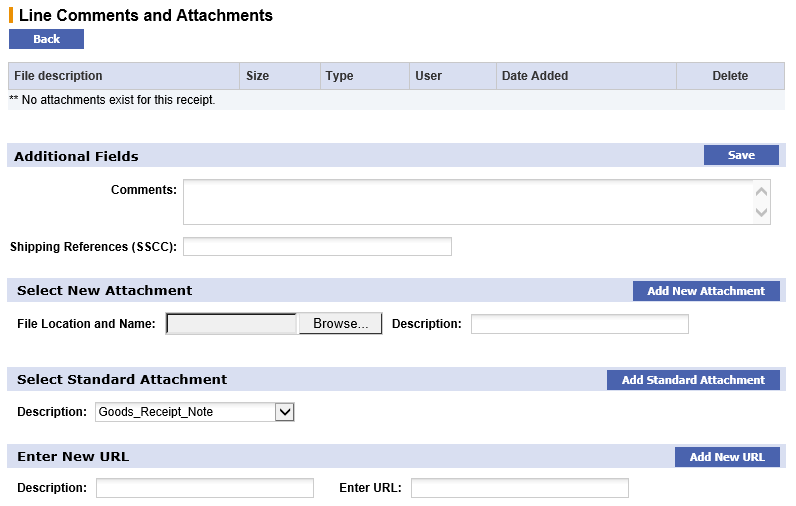
- Comments: Type your free text comments into the Comments box and when finished click the ‘save’ button
- Shipping References (SSCC): If there are any additional shipping or container references you wish to record, they can be entered here.
- Select New Attachment: Click the browse button to locate and select the document that you wish to attach to the receipt record. Enter a Description for the document and then click the ‘add new attachment’ button.
- Select Standard Attachment: Select one of the preloaded documents from the list box. Click the ‘add standard attachment’ button to save the attachment.
All attachments are saved as ‘internal’ attachments and will be available to view in the in the prior receipts history. - Enter URL: To attach a web address where an attachment is held externally, type the details into the ‘Enter URL’ field and enter a description.
- There is no need to enter http:// as this will display at the start of the field automatically.
- The field will validate for URL characteristics (e.g. illegal characters, spaces and a valid extension)
- The length of the URL has a maximum of 250 characters.
Click the ‘Add New URL’ button to save the entered URL. Any attachments defined by a URL will be saved externally and not download or saved in PECOS at any point.
- Attachment Details table: All attachments will appear in the attachment detail table at the top of the screen.

If you wish to delete an attachment at any time click the X delete icon. When an attachment is deleted a confirmation click through message will appear. Click the ‘OK’ button to close the warning and continue with the deletion. Click the ‘Cancel’ button to close the warning and return without deleting.
When all comments and attachments have been entered, click the Back button at the top of the page. Comments and attachments will save and you will be returned to the Receive Items page.
 The attachment icon will change to indicate that a comment or attachment exists (i.e. a piece of paper will appear).
- To save the receipt click on the ‘Save New Receipt’ button. The system will validate that mandatory information is entered (delivery note number, date received and a quantity) and the receipt date is not in the future.
- PECOS P2P will display a ‘Receipt Saved’ message at the top of the screen to confirm that the receipt has been saved.
- Click the ‘Back’ button to return you to the Status Search Results page.
- If you would like to return to the receipt later and not update the order click on the ‘Cancel’ button. Your receipt will not be saved.
Statuses
Before Receipting:
Organisations Using 2-Way Matching:
The default Receipt Status of the order will display as ‘Receipt not required’, indicating that receipting is not required for any items on the order.
It is possible for your system administrator to override the default status and therefore an alternate text will display. For example, if financial matching is performed outside of PECOS P2P your approval plans may not have been configured to include a 3-way matching step. In this circumstance PECOS P2P will assume receipting is not required and the default 2-Way matching receipt status will display. If therefore receipting action is required the default text will be replaced with text indicating (for example) that no items have yet been received.
Organisations Using 3-Way Matching
The Receipt Status of the order will display as ‘No items received’, indicating that receipting is required but not yet performed. It is not possible for your system administrator to override this default text.
After Receipting:
a) The Receipt Status of the order will change to one of the following receipting statuses:
- One or more items have been partially received
- All items have been fully received
- One or more items have been over-received
b) The Order Status will change to ‘Order is open’ and the Settlement Resolution screen will be made available.
Navigation
P2P Procurement